
Prerequisites:
- kubectl command line tool installed. V1.21 or higher required.
- jq command line tool installed.
For clusters hosted on AWS or Azure (including EKS and AKS):
Hyperglance can automatically embed Kubernetes resources into a broader diagram of your AWS or Azure cloud.
To do this first add your AWS Account or Azure Subscription to Hyperglance:
- See how to Add AWS Accounts to Hyperglance
- See how to Add Azure Subscriptions to Hyperglance
Setup Guide:
Step 1) Associate kubectl with the cluster you wish to add to Hyperglance.
Pick the appropriate option for you...
- Option 1) "I already have kubectl pointed at the cluster I wish to use"
Then you can move onto step 2.
- Option 2) "My kubectl manages multiple clusters in a kubeconfig file"
Then switch to the correct cluster using this command:
kubectl config use-context <your-context-name>
- Option 3) "I am new and need to setup kubectl from scratch"
For EKS and AKS users we have outlined some steps below, otherwise you may need to follow instructions specific to your environment or Kubernetes distribution. The Kubernetes website has some helpful links for getting started with kubectl.
For AWS EKS:
- Install the right version of kubectl.
- Install the AWS CLI
- Install the aws-iam-authenticator
- Authenticate to AWS in a terminal by running this command:
aws configure - Configure kubectl to use your EKS cluster by running this command:
aws eks --region <region> update-kubeconfig --name <your-cluster-name>
For Azure AKS:
- Install kubectl (note it is preinstalled on the Azure Cloud Shell)
- Install the Azure CLI (note it is preinstalled on the Azure Cloud Shell)
- Authenticate to Azure in a terminal by running this command:
az login - Configure kubectl to use your AKS cluster by running this command:
az aks get-credentials --resource-group <your-resource-group> --name <your-cluster-name>
Step 2) Create read-only access tokens in your cluster for Hyperglance to use
Download and run the hyperglance-config.sh script at the bottom of this article to create access tokens.
This script creates a new service account in your Kubernetes cluster and writes the account certificate and token into a new (or existing) kubeconfig file in the same directory called hyperglance-kubeconfig.conf
Step 3) Add your Kubernetes cluster details to Hyperglance
a) In your browser visit the Hyperglance Settings https://IP_address. Make sure you use https as the protocol (not http).
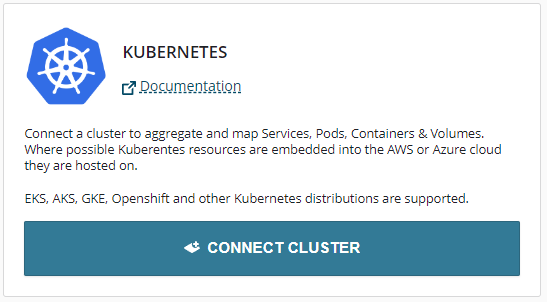
b) Select Settings > Platforms, then click CONNECT CLUSTER:
c) Fill in the dialog as described below and click submit...
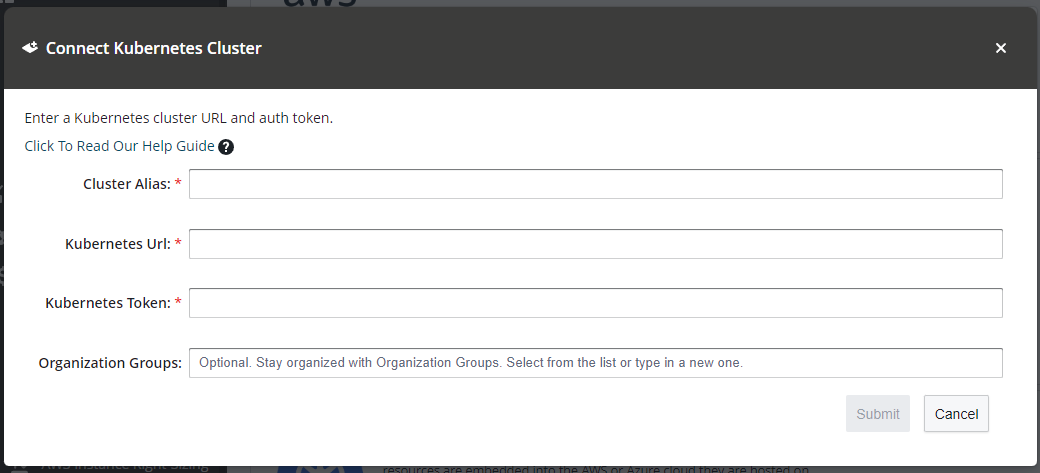
- Cluster Alias: Enter a memorable alias to name your cluster within Hyperglance.
- Kubernetes URL: Paste in the cluster URL you get from the hyperglance-kubeconfig.conf file we generated earlier using the hyperglance_config.sh script.
- Kubernetes Token: Paste in the user token found in the hyperglance-kubeconfig.conf file we generated earlier using the hyperglance_config.sh script.
All being well you should see a new entry created with "Connected" as a status:

Step 4) That's it!
Switch to the Diagram page via the navigation panel on the left:

It may take Hyperglance a few minutes to collect all the data but when it's ready it will show in the inventory & diagram.
If you wish to embed your Kubernetes resources within a broader diagram of AWS or Azure cloud then you can Add your AWS Account or Add your Azure Subscription and Hyperglance will automatically work out how to embed Kubernetes resources within your cloud resources.
hyperglance_config.sh
This script requires the jq command to be available on your PATH. Instructions to install jq can be found here.
Please Note: Kubectl version 1.21 or higher is required.
#!/bin/bash

export SVC_ACT="hyperglance-user"
export NAMESPACE="default"
export KUBECFG_FILE_NAME="./hyperglance-kubeconfig.conf"
export TARGET_FOLDER="test"

create_target_folder() {
  echo -n "Creating target directory to hold files in ${TARGET_FOLDER}..."
  mkdir -p "${TARGET_FOLDER}"
  printf "done"
}

create_service_account() {
  echo -e "\\nCreating a service account: ${SVC_ACT}"
  kubectl create sa "${SVC_ACT}" --namespace "${NAMESPACE}"
}

get_secret_name_from_service_account() {
  echo -e "\\nGetting secret of service account ${SVC_ACT}-${NAMESPACE}"
  SECRET_NAME=$(kubectl get secret/"${SVC_ACT}" --namespace "${NAMESPACE}" -o json | jq -r '.metadata.name')
  echo "Secret name: secret/${SECRET_NAME}"
}

extract_ca_crt_from_secret() {
  echo -e -n "\\nExtracting ca.crt from secret..."
  kubectl get secret "${SECRET_NAME}" --namespace "${NAMESPACE}" -o json | jq -r '.data["ca.crt"]' | base64 -d > "${TARGET_FOLDER}/ca.crt"
  printf "done"
}

get_user_token_from_secret() {
  echo -e -n "\\nGetting user token from secret..."
  USER_TOKEN=$(kubectl get secret "${SECRET_NAME}" --namespace "${NAMESPACE}" -o json | jq -r '.data["token"]' | base64 -d)
  printf "done"
}

create_secret_for_new_kubernetes_api() {
  cat <<EOF | kubectl apply -f -
  apiVersion: v1
  kind: Secret
  metadata:
    name: "${SVC_ACT}"
    annotations:
      kubernetes.io/service-account.name: "${SVC_ACT}"
  type: kubernetes.io/service-account-token
EOF
}

set_kube_config_values() {
  context=$(kubectl config current-context)
  echo -e "\\nSetting current context to: $context"

  CLUSTER_NAME=$(kubectl config get-contexts "$context" | awk '{print $3}' | tail -n 1)
  echo "Cluster name: ${CLUSTER_NAME}"

  ENDPOINT=$(kubectl config view \
  -o jsonpath="{.clusters[?(@.name == \"${CLUSTER_NAME}\")].cluster.server}")
  echo "Endpoint: ${ENDPOINT}"

  # Set up the config
  echo -e "\\nPreparing k8s-${SVC_ACT}-${NAMESPACE}-conf"
  echo -n "Start a new entry in kubeconfig"
  kubectl config set-cluster "${CLUSTER_NAME}" \
  --kubeconfig="${KUBECFG_FILE_NAME}" \
  --server="${ENDPOINT}" \
  --certificate-authority="${TARGET_FOLDER}/ca.crt" \
  --embed-certs=true

  echo -n "Add tokens to Kubeconfig - the Hyperglance API will use this to access your cluster resources."
  kubectl config set-credentials \
  "${SVC_ACT}-${NAMESPACE}-${CLUSTER_NAME}" \
  --kubeconfig="${KUBECFG_FILE_NAME}" \
  --token="${USER_TOKEN}"

  echo -n "Add context entry to kubeconfig, this will be used by hyperglance."
  kubectl config set-context \
  "${SVC_ACT}-${NAMESPACE}-${CLUSTER_NAME}" \
  --kubeconfig="${KUBECFG_FILE_NAME}" \
  --cluster="${CLUSTER_NAME}" \
  --user="${SVC_ACT}-${NAMESPACE}-${CLUSTER_NAME}" \
  --namespace="${NAMESPACE}"
}

create_cluster_role() {
cat <<EOF | kubectl apply -f -
  apiVersion: rbac.authorization.k8s.io/v1
  kind: ClusterRole
  metadata:
    name: hyperglance-cluster-role
  rules:
  -
    apiGroups:
      - ""
      - apps
      - autoscaling
      - batch
      - extensions
      - policy
      - rbac.authorization.k8s.io
      - networking.k8s.io
    resources:
      - componentstatuses
      - configmaps
      - daemonsets
      - deployments
      - events
      - endpoints
      - horizontalpodautoscalers
      - ingresses
      - jobs
      - limitranges
      - namespaces
      - nodes
      - pods
      - persistentvolumes
      - persistentvolumeclaims
      - resourcequotas
      - replicasets
      - replicationcontrollers
      - serviceaccounts
      - services
    verbs:
      - get
      - watch
      - list
  - nonResourceURLs: ["*"]
    verbs:
      - get
      - watch
      - list
EOF
}

create_cluster_role_binding() {
  cat <<EOF | kubectl apply -f -
  apiVersion: rbac.authorization.k8s.io/v1
  kind: ClusterRoleBinding
  metadata:
    name: hyperglance-cluster-role-binding
    namespace: "${NAMESPACE}"
  roleRef:
    apiGroup: rbac.authorization.k8s.io
    kind: ClusterRole
    name: hyperglance-cluster-role
  subjects:
  - kind: ServiceAccount
    name: ${SVC_ACT}
    namespace: "${NAMESPACE}"
EOF
}

create_target_folder
create_service_account

create_secret_for_new_kubernetes_api
get_secret_name_from_service_account
extract_ca_crt_from_secret
get_user_token_from_secret

set_kube_config_values

echo -e "Now Creating RBAC permissions with your current Kubeconfig"
create_cluster_role
create_cluster_role_binding

echo -n "Now, you can copy the newly generated Kubeconfig file to Hyperglance.  It is called ${KUBECFG_FILE_NAME}"