How to enable SAML
How to enable Single-Sign-On (SSO) using SAML for Hyperglance
For Azure AD, follow this step-by-step guide instead
In this mode, Hyperglance acts as a Service Provider (SP) and will delegate its authentication to an external Identity Provider (IdP).
Internally the Hyperglance SAML feature is provided by an Apache HTTPD reverse-proxy running a SAML module called mod_auth_mellon.
Setup Procedure
Step 1: Activate SAML mode on Hyperglance
- SSH into the VM
- Edit config file: /var/lib/data/hyperglance/config.env
- Enable the SAML flag: SAML_ENABLED=true
Step 2: Generate Service Provider (SP) metadata
- Navigate to mellon directory:
cd /var/lib/data/httpd/mellon
- Run metadata creation script:mellon_create_metadata.sh {entity-id-uri} {saml-endpoint-url}
- Example (make sure to adjust the IP address as needed):
-
./mellon_create_metadata.sh https://18.206.76.67 https://18.206.76.67/saml
-
- 1st parameter - Set to the URL of the Hyperglance VM.
- 2nd parameter - Set to: https://{ip-address-of-your-hyperglance}/saml
- The script will print out the ACS URL which will be: https://{ip-address-of-your-hyperglance}/saml/postResponse
Make sure that the IP address or DNS name used for SAML endpoint URL is one that your browser will use. SAML works using browser redirects!
Step 3: Configure Your Identity Provider
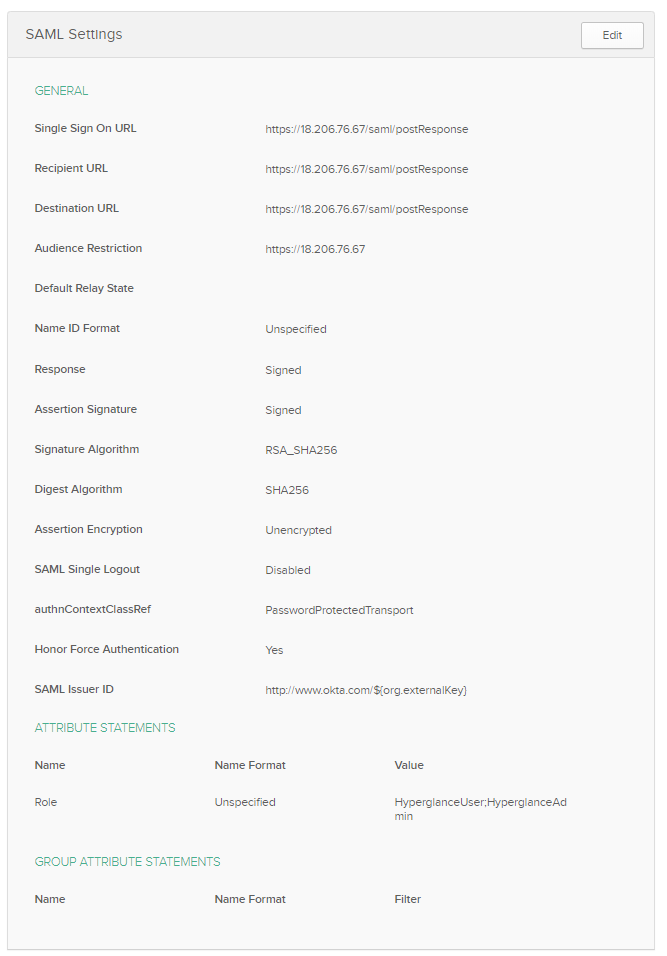
You will need to configure your IdP with the information from the previous step.Here is an example configuration for Okta:

- Some IdP's allow you to upload the sp.xml metadata file to simplify setup.
- For Okta use the ACS URL (the one ending in /postResponse) while others such as KeyCloak only ask for the endpoint URL (the one ending in /saml).
- For Azure AD we have separate a step-by-step guide.
Add a 'Role' Attribute
Hyperglance expects a SAML attribute called Role to pass a semi-colon-separated list of Hyperglance roles.
In the screenshot above we grant admin-level access to Hyperglance by setting the role attribute to: HyperglanceUser;HyperglanceAdmin
Step 4: Add Identity Provider (IdP) metadata
- Replace (or update) the empty idp.xml file in /var/lib/data/httpd/mellon with the XML metadata of your Identity Provider. How you retrieve this XML will vary depending on the exact IdP you use:
- Okta: There is an option to download the xml metadata. We have found that you may need to format the XML for it to work correctly.
- Azure AD: There is an option to download the "Federation Metadata XML".
- KeyCloak: The metadata can be fetched for a particular realm from a public URL: /auth/realms/{realmName}/protocol/saml/descriptor
Step 5: Restart services
- sudo docker-compose -f /etc/docker-compose.yml up -d
Step 6: Testing it
- Using Incognito/InPrivate mode visit your Hyperglance URL in a web browser: https://{ip-address}
- You should be redirected to the IdP login screen.
- Login via your IdP
- You should now be redirected back to Hyperglance.
Troubleshooting Tips
Problems may be due to misconfiguration, either on the Hyperglance appliance (SP) or at the IdP.
Here are some helpful things to check that may help you track down an issue:
- Re-trace these instructions carefully.
- Manually inspect the sp.xml and the idp.xml files and ensure that all URLs, IP addresses and ports are correct from the point-of-view of the user's browser (NOT necessarily from the point-of-view of the Hyperglance appliance box!)
- Check the logs: /var/lib/data/log/httpd
- Check the logs on your IdP
- Ensure that you have configured your IdP correctly against the sp.xml file and that it expects to redirect to the /saml/postResponse endpoint.
- It may help to (temporarily) disable any checks that your IdP does for signed responses.
- See if your issue is documented by mod_auth_mellon:
- In their readme
- In their user-guide
- On their issues tracking page: Here or Here.
- Search online any dedicated guides on how to configure your IdP with mod_auth_mellon. Such instructions would be highly applicable to Hyperglance since that is what we use internally.

